What is Printer Spooling?
Printer spooling is a crucial process in managing print jobs for a printer. When you click ‘print’, your document doesn’t go straight to the printer. Instead, it goes to the print spooler first. The spooler is software that queues print jobs. This means it decides the order print jobs are executed. Think of it like a waiting line. Your document waits its turn to be printed. This allows you to send multiple documents at once, without waiting for each to finish.
Printer spooling serves two main functions. First, it manages the document traffic to the printer. Second, it converts the documents into a printable format that the printer can understand. This allows for efficient printing, without errors or jams.
Evolution of Spooling Technology
Spooling technology has come a long way from its early days. The term ‘spool’ actually comes from ‘Simultaneous Peripheral Operations On-line’. In the past, spooling was about managing data storage. Magnetic tapes would store data as a spool. Now, it’s specialized for printers.
Modern print spoolers are more sophisticated. They can handle complex jobs and communicate with different printer types. This evolution helps make sure that your printing process is smooth and interruption-free. As technology advances, so does the efficiency of print spooling. It’s a vital part of today’s computing, ensuring a seamless bridge between your document and the printed page.
Common Causes of Printer Spooling Errors
Connection Issues between Computers and Printers
One key reason for printer spooling errors is a disrupted connection between the computer and printer. This can occur for various reasons such as loose cables, incorrect network settings, or software conflicts. Ensuring that the printer is properly connected and recognized by your computer is essential. Sometimes, simply restarting both devices can reestablish a lost connection.
Memory Limitations of Printers
Printers often have much less memory than computers, which can lead to spooling errors. If the print job is too complex or the document too large, the printer’s memory may become overloaded. This can cause delays or failures in printing. Selecting a lower resolution or splitting large print jobs into smaller segments can help mitigate this issue.
High Demand on Shared Printers
When multiple users send print jobs to a single printer, it can cause bottlenecks and spooling errors—especially in office environments. This high demand can overwhelm the print spooler, leading to slow processing or paused jobs. Implementing a print management system or setting up multiple print queues can help distribute the workload and reduce spooling errors.
How to Troubleshoot Printer Spooling Problems
When facing printer spooling issues, it’s important to identify the problem before attempting solutions.
Identifying the Root Cause
Determining why printer spooling isn’t functioning is the first step. Look at common factors, like disconnected cables or network errors. Check for large documents in the queue or multiple users printing at once. Look for error messages on your computer or printer that may indicate the issue.
Printer spooling problems may arise due to:
- Malfunctioning print spooler service.
- Outdated or corrupt printer drivers.
- Insufficient printer memory for the print jobs.
By pinpointing the issue, you can apply the right fix. It saves time and prevents further complications.

Step-by-Step Troubleshooting Guide
To start fixing printer spooling errors, follow these steps:
- Restart both your printer and computer to clear temporary glitches.
- Check physical connections or confirm Wi-Fi setup if wireless.
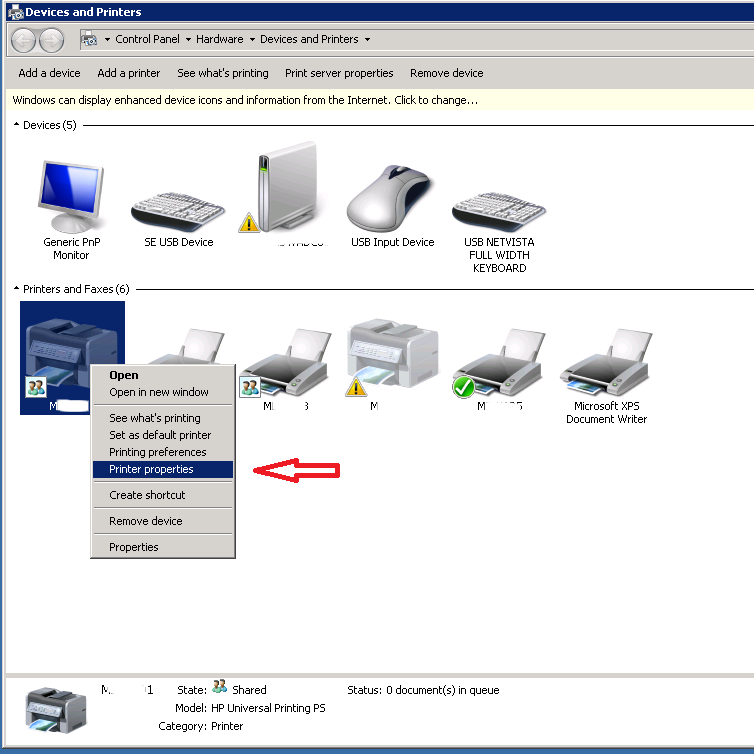
- Open your printer’s queue and cancel any stuck print jobs.
- If jobs remain stuck, restart the print spooler service (more on this in the next section).
- Check for printer driver updates and install if available.
- For persistent problems, consider reinstalling your printer software.
This sequential approach can often resolve spooling problems. Jumping directly to a technical solution might overlook a simple fix. Feel free to skip steps if you are certain they do not apply to your situation.
Solutions for Resolving Spooling Errors on Windows
Spooling errors can halt your print jobs on a Windows system. Let’s look at how you can fix them.
Restarting the Spooler Service
If you’re dealing with a spooling error, restarting the spooler service is a good first step. Here’s how to do it:
- Type ‘services.msc’ in the search box and press Enter.
- Find ‘Print Spooler’ in the list.
- Right-click on ‘Print Spooler’ and select ‘Restart’.
This action should clear the error and get your printer back on track.
Updating or Reinstalling Printer Drivers
Another solution is to deal with printer drivers. Here’s what you can try:
Update Your Drivers:
- Go to ‘Device Manager’.
- Find your printer under ‘Printers’.
- Right-click and choose ‘Update driver’.
Follow the on-screen prompts to complete the update. If that doesn’t work:
Reinstall Your Drivers:
- Dismiss the printer from ‘Device Manager’.
- Unplug the printer and plug it back in.
- Let Windows install the printer automatically.
If all else fails, download the latest drivers from the printer manufacturer’s website. These steps are usually successful for resolving printer spooling issues on Windows.
Fixing Printer Spooling on macOS
When facing spooling issues on a Mac, here’s what you need to do.
Resetting the macOS Printing System
Resetting the macOS printing system can often resolve persistent spooling problems. This process deletes all your printers, so be prepared to add them again. Here’s how to reset:
- Open the Apple menu and select ‘System Settings’.
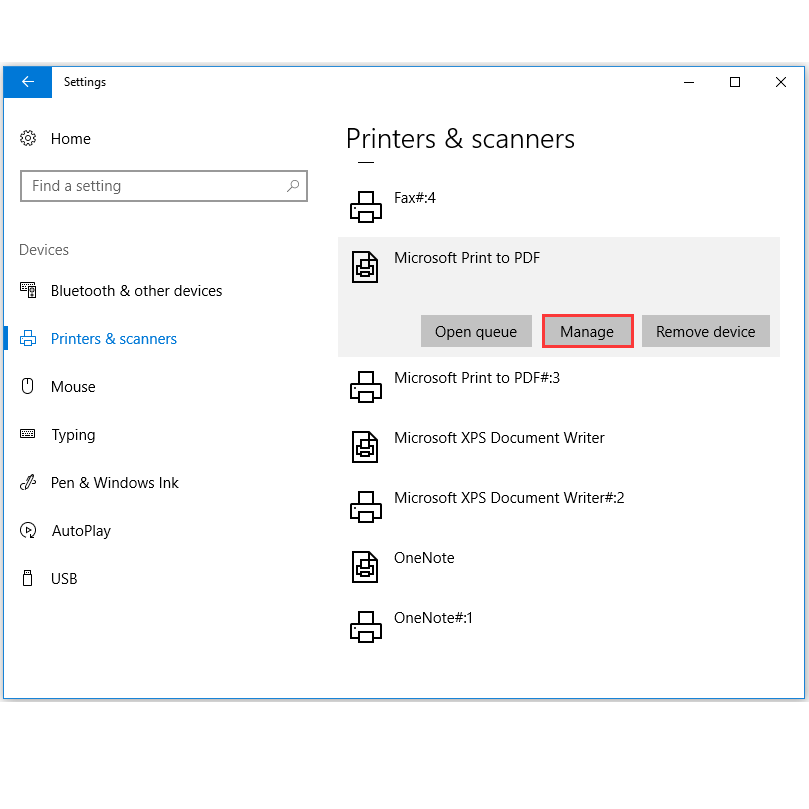
- In the search box or sidebar, find ‘Printers & Scanners’.
- Right-click on the printers list and choose ‘Reset Printing System’ from the menu.
- Confirm the reset and restart your computer.
This should clear any spooling errors and give your system a fresh start.
Adding Printers after Reset
After resetting, you’ll need to reinstall your printers. Follow these simple steps:
- Go back to ‘Printers & Scanners’ in System Settings.
- Click ‘Add Printer, Scanner, or Fax’ at the bottom.
- Select your printer from the list and click ‘Add’.
Make sure your printer is connected or Wi-Fi is setup before adding. These steps should help restore your printing capabilities without spooling errors.
Alternative Spooling Technologies
Exploring different spooling technologies can enhance your printing experience significantly. As technology advances, new solutions emerge that streamline the process and improve performance. Two notable alternatives to traditional print spooling systems are the Common UNIX Printing System (CUPS) and the use of the Internet Printing Protocol (IPP) in printer management.
Common UNIX Printing System (CUPS)
CUPS is a powerful printing system and spooler for Unix-like operating systems. Developed originally by Apple for macOS, it has become a popular choice in Linux systems as well. CUPS supports network printing and local printers. It uses IPP as a basis for managing print jobs and queues. This system simplifies printing, making it more robust and accessible across different platforms. By implementing CUPS, users gain the ability to handle demanding print tasks more efficiently, even in diverse computing environments.
Internet Printing Protocol (IPP) in Printer Management
IPP provides a standardized way to handle print jobs over a network. This protocol allows computers to send print jobs to printers and manage those jobs remotely. Using IPP in printer management leads to improved functionality, including better handling of print queues, status notifications, and more control over printing processes. It’s essential for modern networked environments, ensuring smoother and more reliable printing. Through IPP, users can easily manage printers and gain insights into their operation, ultimately boosting workflow and productivity in any setup. Each of these technologies offers unique benefits that can resolve typical spooling problems and enhance printing operations.
Preventive Measures and Best Practices
Ensuring the smooth operation of your printer involves taking proactive steps. By implementing best practices, you can avoid common printer spooling errors and ensure reliable printer performance.
Regular System and Driver Updates
Regular updates to your system and printer drivers are essential. They help prevent compatibility issues and software glitches that may affect spooling. Checking for updates should be part of your routine maintenance:
- Schedule monthly checks for system updates.
- Always download and install the latest printer drivers from the manufacturer’s website.
- Use automated tools when available, to keep system and drivers updated.
These updates help keep your printing system in-sync with new technologies and fixes.
Optimal Printer Setup and Configuration
Proper setup and configuration of your printer can prevent many issues. Here’s how you can optimize your printer setup:
- Ensure your printer’s placement allows easy access and good ventilation.
- Follow the manufacturer’s guidelines for setup and initial configuration.
- Regularly clean your printer to avoid paper jams and other mechanical issues.
- Configure network settings correctly for network printers to avoid connection drops.
By setting up your printer correctly and maintaining it, you reduce the risk of spooling and other operational problems. This ensures smooth and efficient operation.