Here you can learn about a variety of electronic equipment and office items to help you work and study better. What are you waiting for? Come and take a look!

Month: March 2024 (Page 1 of 2)

What Does the Blue Light on a Ring Camera Mean?

ring camera Introduction:

Ring cameras have become popular security devices for both residential and commercial purposes. These cameras offer various features to enhance security and provide peace of mind. One common feature of Ring cameras is the presence of a blue light. In this comprehensive guide, we will explore the meaning behind the blue light on a Ring camera. By understanding the significance of this indicator, users can better understand the camera’s status and operation.

 Overview of Ring Cameras

Ring Security System:

Ring is a company that specializes in smart home security products, including cameras, doorbells, and security systems.
Ring cameras are designed to monitor and record activities in and around a property.

Features and Functions:

Ring cameras offer features such as motion detection, live streaming, two-way audio, and cloud storage.
These cameras can be controlled and accessed through a smartphone or computer.

Understanding the Blue Light on a Ring Camera

Power and Connectivity:

The blue light on a Ring camera indicates that the camera is powered on and connected to the network.
It provides a visual confirmation that the camera is operational and ready to capture and transmit video footage.

Wi-Fi Connection:

The blue light can also indicate that the Ring camera is connected to a Wi-Fi network.
This connection is necessary for live streaming, remote access, and cloud storage functionality.

Signal Strength:

The intensity or behavior of the blue light can provide information about the signal strength of the camera’s Wi-Fi connection.
A solid blue light usually indicates a strong and stable connection, while a pulsating or flashing blue light may suggest a weaker or unstable connection.

Troubleshooting the Blue Light on a Ring Camera

No Blue Light:

If the blue light on a Ring camera is not illuminated, it may indicate a power or connectivity issue.
Check the power source, cables, and connections to ensure the camera is receiving power and properly connected to the network.

Solid Blue Light:

A solid blue light usually signifies a stable connection. However, if the camera is not functioning as expected, it may be necessary to troubleshoot other potential issues.
Restarting the camera, checking network settings, or contacting customer support can help resolve any performance or functionality problems.

Flashing or Pulsating Blue Light:

A flashing or pulsating blue light on a Ring camera indicates a weaker or unstable Wi-Fi connection.
To improve the signal strength, consider moving the camera closer to the Wi-Fi router, using a Wi-Fi extender, or adjusting the camera’s positioning for better reception.

Enhancing Ring Camera Performance

Wi-Fi Signal Strength:

Maintaining a strong Wi-Fi signal is crucial for optimal performance of Ring cameras.
Ensure that the camera is within range of the router and minimize obstructions that may interfere with the wireless signal.

Device Placement:

Proper placement of the camera is essential for capturing clear and comprehensive footage.
Consider the camera’s field of view, angle, and height to maximize its effectiveness.

Firmware and App Updates:

Regularly check for firmware updates for your Ring camera to ensure it has the latest features and security patches.
Update the Ring app on your smartphone or computer to the latest version for compatibility and improved performance.

ring camera Conclusion:

The blue light on a Ring camera serves as an important indicator of the camera’s status and connectivity. Understanding the meaning behind this blue light can help users ensure their cameras are functioning properly and connected to the network. Troubleshooting any issues related to the blue light can improve the camera’s performance and enhance its functionality. By following the tips outlined in this comprehensive guide, users can optimize their Ring camera setup and enjoy the benefits of enhanced security and peace of mind.


When Was the First Camera Invented: A Comprehensive Guide

 cameraIntroduction:

Cameras have revolutionized the way we capture and preserve moments in history. The journey of camera development spans centuries, beginning with the invention of the camera obscura and leading to the creation of the modern digital cameras we use today. when was the 1st camera invented?In this comprehensive guide, we will explore the history of cameras, starting from the invention of the first camera and tracing its evolution through various technological advancements. By understanding the origins of the camera, we can appreciate the incredible progress and innovation that has shaped the world of photography.

The Invention of the Camera Obscura

Camera Obscura:

The camera obscura, which means “dark room” in Latin, was the precursor to modern cameras.
It consisted of a darkened chamber with a small hole or lens that projected an inverted image onto a surface inside the chamber.

Ancient Origins:

The principles of the camera obscura were known to ancient civilizations like the Ancient Greeks and Chinese.
Early references to the camera obscura can be found in ancient texts and writings.

Evolution of Early Camera Devices

Renaissance Developments:

During the Renaissance, artists and scientists began experimenting with improving the camera obscura.
Innovations included using lenses to improve image clarity and incorporating mechanisms for capturing and preserving the projected images.

17th-18th Century Advancements:

In the 17th and 18th centuries, inventors and scientists made significant advancements in camera technology.
Portable camera obscuras were developed, allowing artists and travelers to capture images more conveniently.

Birth of Photography

Joseph Nicéphore Niépce:

Joseph Nicéphore Niépce is credited with producing the world’s first permanent photograph in 1826.
He used a camera obscura and a bitumen-coated plate to capture the image, which required several hours of exposure time.

Louis Daguerre and the Daguerreotype:

Louis Daguerre, a French inventor, developed the daguerreotype process in the 1830s.
The daguerreotype was the first practical photographic process, producing detailed and finely detailed images.

 cameraEvolution of Camera Technology

Collodion Process:

The collodion process allowed for faster exposure times and the production of multiple prints from a single negative.

Dry Plate Process:

Dry plates allowed for more convenient and portable photography, as they did not require immediate developing.

Roll Film:

The introduction of roll film in the late 19th century revolutionized photography.
Roll film allowed for multiple exposures without needing to change photographic plates, making photography more accessible and convenient.

Arrival of Digital Cameras

Early Digital Cameras:

The concept of digital imaging began in the 1950s, but it wasn’t until the late 20th century that digital cameras became commercially available.

Advancements in Digital Technology:

Rapid technological advancements led to significant improvements in digital cameras.
Higher resolution sensors, increased storage capacity, and the ability to instantly view and share images became standard features.

Conclusion

Cameras have the ability to capture and preserve moments by capturing still images or recording videos. They offer various functionalities such as adjusting exposure, focus, and white balance, allowing users to control the composition, lighting, and overall quality of their photographs or videos. With features like zoom, image stabilization, and different shooting modes, cameras provide flexibility and versatility in capturing a wide range of subjects and scenes, empowering users to express their creativity and preserve memories.

The invention of the camera obscura laid the foundation for the development of modern cameras. From the early experiments with camera obscuras to the birth of photography and the subsequent evolution of camera technology, we have witnessed remarkable progress in capturing and preserving images. The journey from the first permanent photograph to the digital cameras work of today has transformed the way we document our lives and our world. By appreciating the history and innovation behind the camera, we can better understand the power and significance of this incredible invention.


Why Is My Zoom Camera Not Working: A Comprehensive Guide

cameraIntroduction:

Zoom has become an essential tool for virtual meetings, online classes, and connecting with loved ones. However, encountering issues with your Zoom camera can be frustrating, especially when you need it for important video calls. In this comprehensive guide, we will explore common reasons why your Zoom camera may not be working and provide troubleshooting tips to help you resolve the issue. By understanding the potential causes and implementing the necessary steps, you can get your Zoom camera back up and running smoothly.

Several potential consequences or drawbacks:

When the zoom camera on a device is not working, it can have several potential consequences or drawbacks:

Limited functionality:

The primary drawback of a non-functioning zoom camera is the loss of its intended functionality. Zoom cameras are designed to provide users with the ability to capture close-up or distant objects with clarity and detail. Without a working zoom camera, users may not be able to take advantage of this feature, limiting their photographic capabilities.

Reduced versatility:

The zoom camera offers the flexibility to adapt to different shooting scenarios and capture a variety of subjects. Whether it’s zooming in on a distant landscape or zooming out to capture a wide-angle view, a non-working zoom camera restricts the versatility and range of photographic possibilities.

Lower image quality:

A malfunctioning zoom camera can lead to compromised image quality. Issues such as blurry images, distorted zoomed-in shots, or lack of focus can arise, reducing the clarity and sharpness of the captured photographs or videos.

Inconvenience and frustration:

Not being able to rely on the zoom camera when needed can be frustrating, especially if capturing distant or detailed subjects is an essential part of one’s photography needs. It may require users to find alternative solutions or workarounds to achieve the desired results, which can be time-consuming or inconvenient.

Repair or replacement costs:

If the zoom camera is not working due to a hardware malfunction, it may require repair or even replacement. Depending on the device and warranty coverage, this can result in additional costs and inconvenience for the user.

It’s important to troubleshoot and address any issues with a non-working zoom camera to restore its functionality. This may involve software updates, adjusting settings, or seeking professional assistance if it is a hardware problem.

Hardware Issues

Camera Not Detected:

Ensure that your camera is properly connected to your computer or device.
Check the physical connection and make sure the camera is securely plugged in.

Camera Compatibility:

Verify that your camera is compatible with the Zoom software.
Some older or less common cameras may not be recognized by Zoom.

Software Settings and Permissions

Camera Privacy Settings:

Check the camera privacy settings on your device.
Make sure that the camera is allowed to be accessed by the Zoom application.

Zoom Camera Settings:

Open the Zoom application and go to the settings menu.
Confirm that the camera is enabled and selected as the default camera for Zoom.

Operating System Updates

Check for Operating System Updates:

Ensure that your computer or device has the latest operating system updates installed.
Outdated software can sometimes cause compatibility issues with the camera.

Restart Your Computer or Device:

Restarting your computer or device can help reset any temporary issues that may be affecting the camera.

Camera-Specific Troubleshooting

Camera Drivers:

Update the camera drivers on your computer.
Visit the manufacturer’s website and download the latest drivers for your camera model.

Camera Firmware Updates:

Check if there are any firmware updates available for your camera.
Updating the camera firmware can resolve compatibility issues and improve performance.

Video Conferencing Software Settings

Zoom Camera Settings:

Go to Zoom settings and check if the camera is enabled.
Ensure that the correct camera is selected from the available options.

Test Your Camera:

Use the Zoom camera test feature or an external camera testing tool to verify if the camera is working correctly.
If the camera is still not functioning, try using a different video conferencing platform to determine if the issue is specific to Zoom.

Troubleshooting on Mobile Devices

App Permissions:

On mobile devices, check the Zoom app permissions for camera access.
Make sure that the camera permission is enabled for the Zoom app.

Restart the Mobile Device:

Restarting your mobile device can help resolve temporary software glitches that may be affecting the camera.

cameraConclusion:

Encountering issues with your Zoom camera can be frustrating, but by following the troubleshooting tips outlined in this comprehensive guide, you can address the problem effectively. Whether it’s a hardware issue, software setting, or compatibility problem, identifying the cause is the first step towards resolving the camera malfunction. By checking your hardware connections, adjusting software settings, updating drivers and firmware, and ensuring the correct permissions, you can restore the functionality of your Zoom camera. Remember to consult the manufacturer’s guidelines and seek technical support if needed. With a working camera, you can fully participate in virtual meetings, online classes, and stay connected with others through Zoom.


Benefits of Mirrorless Cameras: A Comprehensive Guide

cameraIntroduction:

Mirrorless cameras have gained significant popularity in recent years, revolutionizing the world of photography. With their compact size, advanced features, and versatility, mirrorless cameras offer numerous benefits over traditional DSLR cameras. In this comprehensive guide, we will explore the advantages of mirrorless cameras. From their electronic viewfinders to silent shooting capabilities and lens adaptability, we will delve into the reasons why mirrorless cameras are favored by professional and amateur photographers alike. By understanding these benefits, you can make an informed decision when choosing your next camera.

Compact and Lightweight Design:

Portability:

Mirrorless cameras are significantly smaller and lighter than traditional DSLR cameras.
Their compact size and lightweight design make them ideal for travel or on-the-go photography.

Convenience:

The smaller size of mirrorless cameras allows for easier handling and storage.
They are less cumbersome to carry, reducing the strain on photographers during long shoots or excursions.

Electronic Viewfinder (EVF):

Real-Time Preview:

Mirrorless cameras feature an electronic viewfinder (EVF) that displays a real-time preview of the image.
This allows photographers to see the exposure, white balance, and other settings before capturing the image.

Exposure Simulation:

The EVF of a mirrorless camera can simulate the final exposure of the image, taking into account factors like shutter speed, aperture, and ISO settings.
This feature helps photographers visualize the final result and make necessary adjustments before taking the photo.

Autofocus Performance:

Focus Tracking:

Mirrorless cameras often have advanced autofocus systems that excel in subject tracking and motion detection.
They can maintain focus on moving subjects, making them suitable for sports, wildlife, and other fast-paced photography genres.

Eye and Face Detection:

Many mirrorless cameras offer eye and face detection autofocus capabilities.
This feature ensures accurate focus on the subject’s eyes, resulting in sharp and well-focused portraits.

Silent Shooting:

Electronic Shutter:

Mirrorless cameras use an electronic shutter, eliminating the mechanical shutter noise found in DSLR cameras.
Silent shooting is particularly beneficial in situations that require discretion, such as weddings, wildlife photography, or street photography.

No Mirror Slap:

The absence of a mirror in mirrorless cameras eliminates the vibration caused by mirror movement.
This makes them ideal for capturing images in low-light conditions or when using long exposure times.
Lens Adaptability: 5.1 Lens Mount Adapters:
Mirrorless cameras often allow for the use of lens mount adapters, enabling photographers to attach lenses from different systems.
This opens up a wide range of lens options, including vintage or specialized lenses, providing creative flexibility.

Compact Lens Options:

Manufacturers have developed a variety of compact and high-quality lenses specifically designed for mirrorless camera systems.
These lenses are often smaller and lighter than their DSLR counterparts, contributing to the overall portability of the camera system.

Enhanced Video Capabilities:

4K Video Recording:

Many mirrorless cameras offer 4K video recording capabilities, allowing for high-resolution and detailed footage.
This makes them popular among videographers and content creators.

Focus Peaking and Zebra Patterns:

Mirrorless cameras often provide focus peaking and zebra pattern features when shooting videos.
These assistive tools help videographers achieve accurate focus and exposure control.

Continuous Shooting Speed:

Electronic Shutter:

The absence of a mechanical shutter in mirrorless cameras allows for faster continuous shooting speeds.Mirrorless cameras can achieve rapid burst rates, capturing a high number of frames per second.

Silent Shooting:

Silent shooting mode also contributes to higher continuous shooting speeds, allowing photographers to capture fast-paced action discreetly.

cameraConclusion:

Mirrorless cameras offer numerous benefits that make them a compelling choice for photographers of all levels. With their compact and lightweight design, electronic viewfinders, advanced autofocus systems, and lens adaptability, mirrorless cameras provide unparalleled convenience, versatility, and creative possibilities. Whether you are a professional photographer or an enthusiast, considering a mirrorless camera can open doors to new photography experiences. By understanding and embracing the benefits of mirrorless cameras, you can capture stunning images and enjoy the art and joy of photography to its fullest extent.

Blink Camera Red Light Flashing: Troubleshooting and Solutions

camera red light flashingIntroduction:

The Blink camera is a popular choice for home security, offering easy installation, wireless connectivity, and motion detection capabilities. However, if you notice a red light flashing on your Blink camera, it can indicate an issue that requires attention. In this comprehensive guide, we will explore the possible reasons for a red light flashing on your Blink camera and provide troubleshooting tips and solutions to help you resolve the problem. By following these guidelines, you can ensure that your Blink camera is functioning properly and providing the security you need.

Low Battery Level:

Check Battery Status:

Open the Blink app and navigate to the Camera Settings to check the battery level of your Blink camera.
If the battery level is low, it can cause the red light to flash as a warning sign.

Replace or Recharge Batteries:

If the battery level is low, replace the batteries with fresh ones or recharge the existing batteries.
Ensure that the batteries are properly inserted and making a secure connection.

Connectivity Issues:

Wi-Fi Signal:

Check the Wi-Fi signal strength in the area where your Blink camera is installed.
Weak or unstable Wi-Fi connections can cause a red light to flash.

Router Placement:

Ensure that your wireless router is positioned within a reasonable distance of your Blink camera.
Physical barriers such as walls or large objects can weaken the Wi-Fi signal.

Reset and Reconnect:

If you suspect a connectivity issue, try resetting your Blink camera and reestablishing the connection to your Wi-Fi network.
Follow the instructions in the Blink app to reset and reconnect the camera.

Camera Offline:

Power Cycle:

If your Blink camera is showing a red light and is offline, try power cycling the camera.
Disconnect the camera from its power source, wait for a few seconds, and then reconnect it.

Reconnect to Wi-Fi:

After power cycling the camera, reconnect it to your Wi-Fi network using the Blink app.
Follow the instructions provided in the app to ensure a successful reconnection.

Software Updates:

Check for Updates:

Ensure that your Blink camera is running the latest firmware version.
Check for any available updates in the Blink app and install them if necessary.

Install Updates:

If updates are available, follow the prompts in the Blink app to download and install them.
Keeping your Blink camera up to date can resolve potential issues and improve performance.

Camera Placement and Environment:

Temperature Extremes:

Extreme temperatures can affect the performance of your Blink camera.
Ensure that your camera is not exposed to excessive heat or cold, as it can cause the red light to flash.

Obstructions and Reflections:

Make sure that there are no physical obstructions or reflections interfering with the camera’s field of view.
Clear away any objects or debris that may be obstructing the camera’s vision.

Contacting Support:

Troubleshooting Resources:

Consult the Blink website or support documentation for further troubleshooting resources specific to your camera model.
These resources may provide additional guidance on resolving issues related to a flashing red light.

Customer Support:

If you have tried all the troubleshooting steps and the red light continues to flash, contact Blink customer support for further assistance.
They can provide personalized guidance and help resolve any persistent issues.

camera red light flashingConclusion:

A red light flashing on your Blink camera can indicate an issue that requires attention. By following the troubleshooting tips and solutions provided in this comprehensive guide, you can resolve the problem and ensure that your Blink camera is functioning properly. Remember to check the battery level, address connectivity issues, update the camera’s firmware, and ensure proper camera placement. If all else fails, don’t hesitate to contact Blink customer support for further assistance. With a properly functioning Blink camera, you can have the peace of mind knowing that your home is secure.

When Were Cameras Invented: A Comprehensive Exploration

 cameraIntroduction-when were camera invented:

Cameras have become an integral part of our lives, capturing moments and preserving memories. But have you ever wondered when cameras were first invented? In this comprehensive guide, we will explore the fascinating history of cameras. From ancient camera obscuras to the invention of the first practical camera and the evolution of photography, we will delve into the milestones and innovations that have shaped the world of photography. By understanding the origins of cameras, we can appreciate how far we have come in capturing and documenting the world around us.

Camera Obscura: The Predecessor to Cameras:

Ancient Origins:

The concept of camera obscura, a darkened room or box with a small hole that projects an inverted image on a surface, dates back to ancient times.
Ancient Greek and Chinese scholars documented the principles of camera obscura and used them for various purposes.

Medieval and Renaissance Usage:

During the medieval and Renaissance periods, camera obscura became popular among artists and scientists.
It served as a tool for creating accurate sketches and understanding the principles of optics.

 cameraInvention of the First Practical Camera:

Joseph Nicéphore Niépce and the First Photograph:

In the early 19th century, Joseph Nicéphore Niépce achieved a major breakthrough in photography with the creation of the first permanent photograph.
He used a camera obscura and a photosensitive substance called bitumen to capture the image.

Louis Daguerre and the Daguerreotype:

Louis Daguerre, a French inventor, further advanced photography with the invention of the daguerreotype process.
He refined the techniques pioneered by Niépce and produced highly detailed and sharp images on a silver-plated copper plate.

 cameraEvolution of Cameras and Photography:

Collodion Process and Wet Plate Photography:

In the mid-19th century, Frederick Scott Archer introduced the collodion process, which improved the quality and efficiency of photography.
This process involved coating a glass plate with a mixture of chemicals to create a light-sensitive surface.

Dry Plate and Roll Film:

The introduction of dry plate photography by Richard Leach Maddox in the 1870s made photography more accessible and convenient.
Dry plates could be prepared in advance and used in portable cameras.

George Eastman and the Kodak Camera:

In 1888, George Eastman launched the Kodak camera, which revolutionized photography for the masses.
The Kodak camera was lightweight, portable, and came pre-loaded with a roll of film, making it accessible to amateur photographers.

Flexible Roll Film and 35mm Film:

The invention of flexible roll film by George Eastman and the introduction of the 35mm film format by Oskar Barnack in the early 20th century marked significant milestones in photography.
These advancements allowed for smaller cameras and greater flexibility in capturing images.

When Were Cameras Invented: A Comprehensive Exploration插图3Technological Advancements in Cameras:

Single Lens Reflex (SLR) Cameras:

SLR cameras, which use a mirror and prism system to allow photographers to see through the lens, were introduced in the early 20th century.
SLRs provided a more accurate representation of the final image and became popular among professional photographers.

Digital Cameras:

The advent of digital photography in the late 20th century revolutionized the industry.
Digital cameras use electronic sensors to capture and store images digitally, eliminating the need for film.

Smartphone Cameras:

The integration of high-quality cameras into smartphones has made photography more accessible and convenient than ever before.
Smartphone cameras continue to advance, incorporating features such as multiple lenses, computational photography, and enhanced image processing capabilities.

Cameras hold significant importance for several reasons:

Preserving Memories: Cameras allow us to capture and preserve precious moments and memories. Whether it’s a family gathering, a vacation, or a special event, cameras enable us to document and relive these experiences for years to come.

Communication:

Cameras play a vital role in visual communication. They allow us to share experiences, stories, and emotions with others through photographs and videos. Images captured by cameras can convey messages, evoke emotions, and bridge cultural or language barriers.

Creative Expression:

Cameras serve as tools for creative expression. They enable photographers to capture scenes and subjects in unique and artistic ways. Photography as an art form allows individuals to showcase their perspective, creativity, and storytelling abilities.

Documentation and Journalism:

Cameras are essential tools for documentation and journalism. They help capture important events, news, and historical moments. Photographs and videos captured by cameras serve as evidence, tell stories, and contribute to the preservation of history.

Surveillance and Security:

Cameras play a crucial role in surveillance and security systems. They help monitor and deter criminal activities, ensuring the safety of individuals and properties. Cameras are used in public spaces, homes, businesses, and various industries to provide a sense of security and accountability.

Education and Research:

Cameras are valuable tools in education and research. They aid in visual documentation, experimentation, and analysis. Cameras allow scientists, researchers, and educators to capture and study phenomena, conduct experiments, and record findings.

Tourism and Exploration:

Cameras are indispensable for capturing the beauty and diversity of landscapes, cultures, and wildlife. They enable us to document and share our travel experiences, promoting tourism and fostering cultural understanding.

Marketing and Advertising:

Cameras play a significant role in marketing and advertising industries. They help create appealing visuals for products, services, and brands. High-quality images and videos captured by cameras are essential for promoting and selling goods and attracting consumers.

In summary, cameras hold immense importance in preserving memories, facilitating communication, enabling creative expression, documenting events, ensuring security, supporting education and research, promoting tourism, and driving marketing efforts. Their ability to capture moments, convey messages, and provide visual documentation contributes to their significance in various aspects of life.

When Were Cameras Invented: A Comprehensive Exploration插图4Conclusion-when were camera invented:
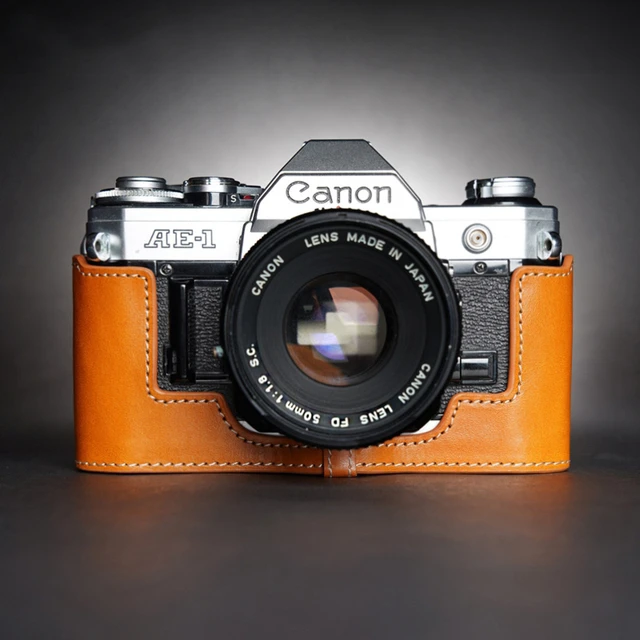
The invention and evolution of cameras have transformed the way we capture and document the world around us. From the camera obscura to the invention of the first practical camera and the subsequent advancements in photography, cameras have come a long way. Through the ages, photography has become more accessible, portable, and technologically advanced, allowing us to preserve memories and express our creativity. As cameras continue to evolve, we can look forward to further innovations that will shape the future of photography.

Canon AE-1 Camera: A Classic Photography Companion

cameraIntroduction:

The Canon AE-1 Camera is a legendary film camera that revolutionized the world of photography when it was first introduced in 1976. Known for its innovative features, user-friendly design, and exceptional image quality, the Canon AE-1 quickly became a favorite among amateur and professional photographers alike. In this comprehensive guide, we will explore the Canon AE-1 camera, its key features, and its impact on the world of photography. From its iconic design to its manual controls and interchangeable lenses, we will delve into the reasons why the Canon AE-1 Camera remains a beloved classic for photography enthusiasts.

cameraDesign and Features of the Canon AE-1:

Iconic Design:

The Canon AE-1 features a stylish and sleek design, with a black body and chrome accents.
Its compact and lightweight build makes it easy to carry and handle during photography sessions.

Manual Controls:

The Canon AE-1 Camera  offers a range of manual controls, allowing photographers to have full creative control over their images.
Key features include manual exposure settings, aperture priority mode, and manual focus.

Interchangeable Lenses:

One of the standout features of the Canon AE-1 is its ability to use interchangeable lenses.
This allows photographers to adapt to different shooting conditions and achieve a wide range of artistic effects.

Impact and Legacy of the Canon AE-1:

Accessibility and Popularity:

The Canon AE-1 played a significant role in making photography more accessible to amateur photographers.
Its user-friendly design, affordable price point, and availability of accessories made it a popular choice for photography enthusiasts.

Technological Advancements:

The Canon AE-1 introduced several technological advancements that set it apart from its predecessors.
It was one of the first cameras to feature automatic exposure, making it easier for photographers to achieve correct exposure settings.

Influence on the Photography Industry:

The Canon AE-1 had a profound impact on the photography industry, inspiring other manufacturers to incorporate similar features and design elements in their own cameras.
Its success solidified Canon’s reputation as a leading camera manufacturer and set the stage for future innovations.

Using the Canon AE-1:

Loading Film:
To use the Canon AE-1, photographers must first load the film into the camera.
This involves opening the camera back, inserting the film cartridge, and threading the film correctly.

Manual Exposure Settings:

Photographers can manually adjust the aperture, shutter speed, and ISO settings on the Canon AE-1 to achieve their desired exposure.
This level of control allows for creative freedom and experimentation with different lighting conditions.

Focusing and Composition:

The Canon AE-1 utilizes a manual focus system, requiring photographers to adjust the focus ring on the lens.
Composing the shot involves utilizing the viewfinder to frame the subject and make any necessary adjustments.

cameraMaintaining and Caring for the Canon AE-1:

Proper Storage:

When not in use, it is important to store the Canon AE-1 in a cool and dry environment, away from direct sunlight and excessive humidity.
This helps protect the camera from damage and prevents deterioration of its components.

Regular Cleaning:

It is essential to clean the camera regularly to remove dust, dirt, and other debris.
Use a soft brush or cloth to gently clean the body and lens, taking care to avoid scratching the surfaces.
4.3 Battery Replacement:

The Canon AE-1 uses a battery to power its light meter and other electronic components.
Regularly check the battery level and replace it as needed to ensure accurate exposure readings.

Canon AE-1 Camera: A Classic Photography Companion插图3The Canon AE-1 in the Digital Age:
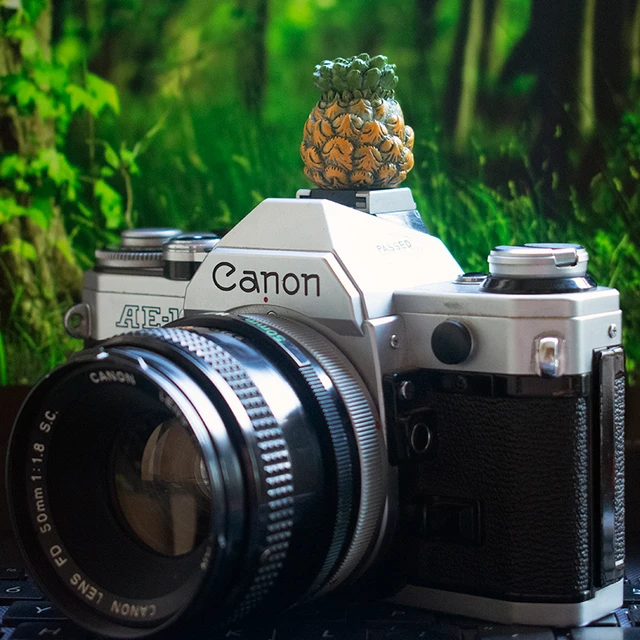
Film Photography Resurgence:

Despite the rise of digital photography, film photography has experienced a resurgence in recent years.
The Canon AE-1 remains a sought-after camera for enthusiasts who appreciate the unique qualities and aesthetic of film.

Legacy and Collectibility:

The Canon AE-1 has become a collector’s item, with many photographers seeking to own and use this iconic camera.
Its enduring legacy and historical significance contribute to its desirability among photography enthusiasts.

A few drawbacks:

The Canon AE-1 Camera, although widely regarded as a classic and popular film camera, has a few drawbacks:

Manual Focus:

The AE-1 is a manual focus camera, which means you have to manually adjust the focus ring on the lens to achieve sharp focus. This can be challenging for beginners or those accustomed to autofocus cameras, especially when shooting fast-moving subjects or in low light conditions.

Limited Exposure Modes:

The AE-1 primarily offers manual exposure control, with limited aperture-priority and shutter-priority modes. While manual control allows for creative freedom, it can be time-consuming to adjust settings for each shot, especially in dynamic shooting situations.

Lack of Auto-Exposure Lock:

The AE-1 doesn’t have a dedicated auto-exposure lock feature. This means that once you achieve the desired exposure, you need to hold the shutter release button halfway pressed to maintain the exposure settings. This can be inconvenient and make it harder to capture fast-changing lighting conditions or reframe compositions.

Limited Metering Range:

The AE-1 utilizes a center-weighted average metering system, which measures the light primarily in the center of the frame. This can result in inaccurate exposures when the subject is backlit or when there are significant variations in lighting across the frame.

Reliance on Batteries:

The AE-1 requires batteries to operate, specifically for powering the light meter. If the batteries run out or are not easily accessible, the camera’s light meter will cease to function, making it difficult to accurately judge exposure settings.

Size and Weight:

The AE-1 is relatively large and heavy compared to modern digital cameras. Carrying it for extended periods or during travel may be cumbersome, especially when combined with additional lenses and accessories.

Despite these drawbacks, the Canon AE-1 Camera remains a beloved choice for photography enthusiasts due to its iconic design, reliable build quality, and the ability to capture high-quality film images.

Canon AE-1 Camera: A Classic Photography Companion插图4Conclusion:

The Canon AE-1 remains a beloved classic in the world of photography. Its iconic design, manual controls, and interchangeable lens system make it a versatile and highly capable camera. With its impact on the industry and its enduring popularity, the Canon AE-1 Camera continues to inspire photographers to explore the art and craft of film photography. Whether you are a seasoned professional or an aspiring enthusiast, the Canon AE-1 is a photography companion that will capture your imagination and allow you to create stunning images that stand the test of time.

Installing Blink Outdoor Camera: A Comprehensive Guide

blink outdoor cameraIntroduction:

The Blink Outdoor Camera is a popular choice for home security, offering easy installation, wireless connectivity, and motion detection capabilities. Whether you are a beginner or experienced in home security systems, installing the Blink Outdoor Camera can be a straightforward process. In this comprehensive guide, we will explore the step-by-step instructions for installing the Blink Outdoor Camera. From preparing the camera and sync module to mounting the camera and configuring settings, we will provide practical tips and techniques to help you set up your Blink Outdoor Camera successfully. By following these guidelines, you can enhance the security of your home and enjoy peace of mind.

blink outdoor camera
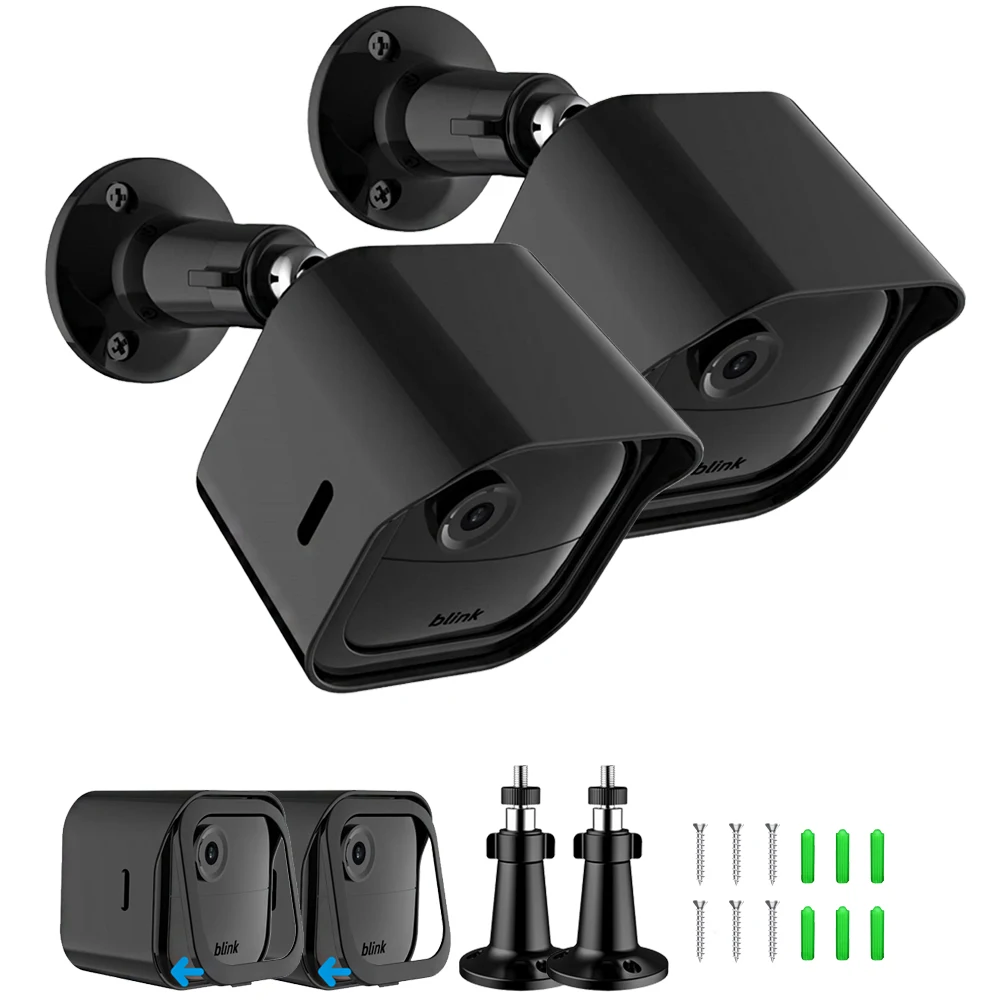
Unboxing and Preparing the Blink Outdoor Camera:

Unboxing:

Open the package and take out the Blink Outdoor Camera and its components, including the camera unit, mounting hardware, battery pack, and USB cable.

Camera Placement:

Choose a suitable location for the camera that provides optimal coverage of the area you want to monitor.
Consider factors such as visibility, Wi-Fi signal strength, and protection from the elements.

Sync Module Placement:

Decide where to place the sync module, which serves as the connection hub between the cameras and your Wi-Fi network.
Ensure the sync module is within a reasonable range of the camera and has a strong Wi-Fi signal.

Installing the Blink Outdoor Camera:

Inserting the Battery Pack:

Open the battery compartment on the camera unit and insert the provided battery pack.
Ensure the battery pack is properly inserted and secure.

Syncing the Camera and Sync Module:

Connect the sync module to a power source using the provided USB cable.
Follow the in-app instructions to sync the camera and sync module wirelessly.

Connecting to Wi-Fi:

Use the Blink app to connect the sync module to your home Wi-Fi network.
Follow the on-screen instructions to enter your Wi-Fi credentials and establish a connection.

blink outdoor camera
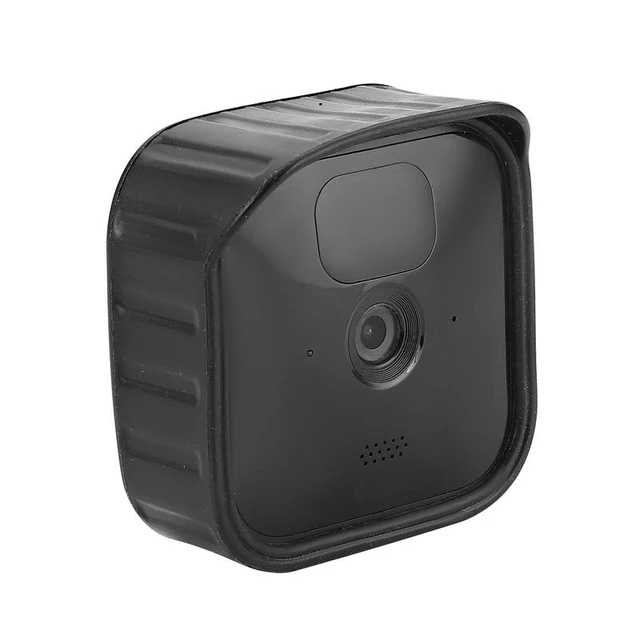
Mounting the Blink Outdoor Camera:

Mounting Options:

Choose the appropriate mounting option based on your needs and the location of the camera.
The Blink Outdoor Camera can be mounted using the provided mounting bracket, screws, or adhesive backing.

Mounting Instructions:

Attach the mounting bracket to the desired surface using screws or adhesive backing.
Align the camera unit with the mounting bracket and secure it in place.

Angling the Camera:

Adjust the angle of the camera to ensure it captures the desired area and provides optimal coverage.
Use the swivel and tilt capabilities of the mounting bracket to position the camera accordingly.

Configuring Blink Outdoor Camera Settings:

Camera Name and Location:

Assign a name to your Blink Outdoor Camera and specify its location in the Blink app.
This helps with identifying and managing multiple cameras if you have more than one.

Motion Detection Zones:

Customize the motion detection zones based on your preferences and the specific areas you want the camera to monitor.
Use the Blink app to define the areas of interest and adjust sensitivity levels.

Scheduling and Arming Modes:

Set up schedules and arming modes to control when the camera is active and monitoring for motion.
Customize these settings based on your daily routines and surveillance needs.

Installing Blink Outdoor Camera: A Comprehensive Guide插图3Maintenance and Troubleshooting:

Battery Maintenance:

Monitor the battery level of your Blink Outdoor Camera regularly.
Replace the battery pack as needed to ensure uninterrupted functionality.

Camera Positioning:

Periodically review the camera’s positioning and readjust if necessary.
Ensure that the camera continues to provide optimal coverage and captures the desired areas.

Connectivity and Firmware Updates:

Keep an eye on Wi-Fi connectivity and ensure a strong signal for reliable camera operation.
Regularly check for firmware updates within the Blink app and install them as needed to maintain optimal performance.

To clean and maintain your Blink Outdoor Camera on a daily basis, follow these steps:

Dust Removal:

Use a soft, dry cloth or a microfiber cloth to gently wipe away any dust or debris from the camera’s exterior. Avoid using harsh chemicals or abrasive materials that could damage the camera.

Lens Cleaning:

Use a lens cleaning solution specifically designed for camera lenses or eyeglasses. Apply a small amount of the solution to a lens cleaning cloth or lens cleaning tissue and gently wipe the camera lens in a circular motion to remove any smudges or fingerprints. Avoid using excessive force or scratching the lens.

Cable Maintenance:

Check the cables connected to the camera regularly to ensure they are secure and free from any damage. If you notice any frayed cables or loose connections, contact Blink support for assistance or consider replacing the cables as needed.

Weatherproofing:

The Blink Outdoor Camera is designed for outdoor use and is weather-resistant. However, it’s still important to ensure that the camera’s housing and seals are intact to maintain its resistance to dust, moisture, and extreme temperatures. Inspect the camera regularly for any signs of damage or wear, such as cracks or gaps in the housing, and contact Blink support if you notice any issues.

Battery Maintenance:

If you are using battery-powered Blink Outdoor Cameras, regularly check the battery level using the Blink app and replace the batteries as needed. Follow the manufacturer’s instructions on proper battery usage and disposal.

Firmware Updates:

Keep your Blink Outdoor Camera up to date by installing any firmware updates released by Blink. These updates often include improvements, bug fixes, and security enhancements. Check the Blink app or Blink website for any available updates and follow the instructions provided.

By following these maintenance steps, you can ensure that your Blink Outdoor Camera remains clean, functional, and in optimal condition for capturing and monitoring your outdoor surroundings.

Installing Blink Outdoor Camera: A Comprehensive Guide插图4

Conclusion:

Installing the Blink Outdoor Camera is a straightforward process that can greatly enhance the security of your home. By following the step-by-step instructions provided in this comprehensive guide, you can set up your Blink Outdoor Camera successfully. From preparing the camera and sync module to mounting the camera and configuring settings, each step is critical for establishing a reliable and effective surveillance system. With proper installation and maintenance, your Blink Outdoor Camera will provide peace of mind and ensure the safety of your home and loved ones.

How Does a 360 Camera Work?

360 cameraIntroduction:

360 cameras have revolutionized the way we capture and experience photos and videos. These innovative devices offer a panoramic perspective, capturing a full 360-degree view of the surroundings. But have you ever wondered how a 360 camera works? In this comprehensive article, we will demystify the magic behind 360 cameras, explaining the technology and techniques that enable these devices to capture immersive and interactive images. From multiple lenses and sensors to stitching and software processing, we will guide you through the fascinating workings of a 360 camera.Multiple Lenses and Sensors:

Wide Field of View: A 360 camera typically consists of multiple lenses and sensors strategically positioned to capture a wide field of view. These lenses face in different directions, allowing the camera to capture a complete 360-degree view of the surroundings.

Simultaneous Capture: The lenses and sensors in a 360 camera work together to capture images or video simultaneously, ensuring that every angle is captured at the same moment.

Stitching and Image Processing:

Image Stitching:

Once the images or videos are captured by the multiple lenses and sensors, the next step is to stitch them together seamlessly. Image stitching is a process that aligns and blends the individual images or frames to create a cohesive, panoramic view of the entire scene.

Overlapping Areas:

The overlapping areas between the individual images are crucial for accurate stitching. These overlapping areas provide reference points for aligning and merging the images together.

Software Algorithms:

Advanced software algorithms analyze the individual images, looking for matching features and patterns. These algorithms then align and blend the images together, creating a smooth and continuous 360-degree view.

Image Correction:

During the stitching process, image correction techniques, such as color correction and exposure adjustment, may be applied to ensure consistency and enhance the overall quality of the final image.

360 camera

Gyroscopes and Sensors:

Orientation Detection:

To accurately capture the spatial orientation of the camera, 360 cameras often incorporate gyroscopes and other sensors. These sensors detect the camera’s tilt, pitch, and rotation, ensuring that the captured image or video reflects the correct orientation.

Image Stabilization:

Gyroscopes and sensors also play a role in image stabilization, helping to reduce camera shake and unwanted motion during capturing. This results in smoother and more stable images and videos.

Storage and File Formats:

Large File Sizes:

Due to the high-resolution nature of 360-degree images and videos, they tend to have larger file sizes compared to traditional photos and videos. The extensive amount of visual information captured requires more storage space.

File Formats:

360 cameras generally save the captured images or videos in specialized file formats, such as equirectangular or cubic formats. These formats are designed to store the complete 360-degree view and allow for playback and interaction on compatible devices and platforms.

Viewing and Interacting:

Compatible Devices:

To fully experience and interact with 360-degree photos and videos, you need a compatible device. These may include smartphones, tablets, computers, or dedicated virtual reality (VR) headsets.

Specialized Players and Apps:

Specialized players and apps are available for viewing and interacting with 360-degree content. These applications allow users to explore the scenes, zoom in or out, and navigate through the panoramic view by dragging, tilting, or using touch gestures.

Virtual Reality (VR):

360-degree content is particularly immersive and engaging when viewed through VR headsets. VR technology creates a virtual environment, allowing users to feel as if they are physically present in the captured scene. This adds an extra dimension of immersion and realism to the 360-degree experience.

360 camera

Advancements in 360 Camera Technology:

Higher Resolution:

As technology advances, 360 cameras are becoming capable of capturing higher-resolution images and videos. This allows for greater detail and clarity in the captured scenes.

Improved Image Processing:

Advancements in image processing technology have led to better stitching algorithms and software, resulting in more accurate and seamless 360-degree images.

Live Streaming:

Some modern 360 cameras offer live streaming capabilities, allowing users to share their experiences in real-time with an audience. This opens up a new realm of possibilities for live events, virtual tours, and interactive storytelling.

How Does a 360 Camera Work?插图3

Some common disadvantages of 360 cameras:

While 360 cameras offer unique and immersive perspectives for capturing photos and videos, they also have certain drawbacks. Here are some common disadvantages of 360 cameras:

Image Quality:

In general, 360 cameras may not provide the same level of image quality as traditional cameras. Due to the need to capture a wide field of view, the resolution and sharpness of individual images or video frames may be lower, resulting in less detailed and potentially softer output.

Stitching Artifacts:

360 cameras use multiple lenses to capture a complete view, and the resulting images or videos need to be stitched together. Sometimes, this stitching process can lead to visible seams or distortion in the final output, particularly in areas where the lenses overlap. This can impact the visual quality and overall viewing experience.

Limited Low-Light Performance:

Most 360 cameras struggle to perform well in low-light conditions. The smaller sensor size and wider field of view can result in increased noise, reduced dynamic range, and lower overall image quality in low-light or nighttime settings.

Battery Life:

Due to their continuous capture and processing of a wide field of view, 360 cameras can consume more power than traditional cameras. This often results in shorter battery life, requiring frequent recharging or carrying spare batteries for extended use.

Complex Post-Processing:

Working with 360-degree content can be more challenging and time-consuming compared to traditional media. The spherical nature of the images or videos requires specialized software and techniques for editing and rendering, which may require a learning curve or additional investment in post-processing tools.

Limited Compatibility:

Viewing and sharing 360-degree content may require specific platforms or software that support the immersive format. Not all devices, apps, or social media platforms fully support the seamless playback and sharing of 360-degree content, potentially limiting its accessibility to a wider audience.

Higher Cost:

Compared to traditional cameras, 360 cameras generally come with a higher price tag. The advanced technology and specialized lenses required to capture 360-degree content contribute to the increased cost, making them less accessible for budget-conscious consumers.

It’s important to consider these drawbacks alongside the benefits and intended use cases when evaluating whether a 360 camera is the right choice for your photography or videography needs.

How Does a 360 Camera Work?插图4

Conclusion:

360 cameras capture the world in a whole new way, providing immersive and interactive 360-degree images and videos. Through multiple lenses, sensors, and advanced software processing, these devices enable us to experience a complete panoramic view of our surroundings. From image stitching and orientation detection to storage considerations and specialized file formats, each component and process works together to create the magic of 360-degree photography. Embrace the captivating world of 360 cameras and explore the endless possibilities they offer for capturing and sharing immersive visual experiences.

Ring Camera Won’t Connect to WiFi: Troubleshooting Guide

cameraIntroduction:

Ring cameras offer peace of mind and security, allowing homeowners to monitor their property remotely. However, encountering connectivity issues where your Ring camera won’t connect to WiFi can be frustrating. A reliable WiFi connection is crucial for the proper functioning of your Ring camera. In this comprehensive article, we will provide a troubleshooting guide to help you resolve connectivity issues and get your Ring camera back online. From checking your WiFi signal strength to resetting your camera and router, we will guide you through the steps to ensure a seamless connection.

Disadvantages of Ring cameras:

While Ring cameras offer many benefits and features, they also have some potential drawbacks. Here are a few common criticisms or disadvantages of Ring cameras:

Privacy Concerns:

Ring cameras may raise privacy concerns due to their ability to capture video and audio footage of the surrounding area. There have been instances where unauthorized access to Ring cameras or data breaches have occurred, potentially compromising individuals’ privacy.

Dependence on WiFi:

Ring cameras heavily rely on a WiFi connection to function properly. If the WiFi network is unreliable or experiences outages, the camera’s performance and functionality may be affected, leading to gaps in surveillance or delayed alerts.

Subscription Costs:

While basic features like live streaming and motion detection are available for free, some advanced features and storage options require a subscription plan, such as Ring Protect. This ongoing cost may be seen as a disadvantage for those on a tight budget.

Limited Field of View:

The field of view for Ring cameras varies depending on the specific model. Some cameras may have a narrower field of view, which could limit the coverage area and require multiple cameras for comprehensive surveillance of larger spaces.

Installation Challenges:

While Ring cameras are designed for easy installation, some users may encounter challenges when setting up the cameras, such as finding suitable mounting locations or troubleshooting connectivity issues.

It’s important to consider these drawbacks alongside the benefits when evaluating whether Ring cameras are the right choice for your home security needs.

camera

Several consequences and potential hazards:

When a Ring camera won’t connect to WiFi, it can have several consequences and potential hazards. Here are some possible risks:

Limited Surveillance:

If the Ring camera cannot connect to WiFi, it cannot transmit video or audio feeds to the owner’s device or the cloud. This hampers the camera’s ability to provide real-time surveillance and monitoring, compromising home security.

Incomplete Event Recording:

Ring cameras are designed to record and store video footage of events, such as motion detection or doorbell activity. If the camera is not connected to WiFi, it may not be able to record or store these events, leading to gaps in the recorded footage.

Limited Remote Access:

The inability to connect to WiFi restricts remote access and control of the Ring camera. Users may not be able to access the camera’s live feed, adjust settings, or receive notifications through the Ring app or other connected devices.

Loss of Smart Home Integration:

Ring cameras can integrate with other smart home devices, allowing users to create automated routines and enhance home security. When not connected to WiFi, the camera may not be able to interact with other devices, reducing the effectiveness of the smart home ecosystem.

Delayed or Ineffective Alerts:

If the Ring camera is unable to connect to WiFi, it may not be able to send timely alerts or notifications to the owner’s devices. This can result in delayed awareness of potential security threats or events happening around the property.

Reduced Device Functionality:

Some features of the Ring camera, such as two-way audio communication or cloud storage, may rely on WiFi connectivity. The lack of WiFi connection can limit or disable these functions, reducing the overall functionality and usability of the device.

It is crucial to troubleshoot and address connectivity issues promptly to ensure the Ring camera operates effectively and maintains optimal home security capabilities.

camera

Check WiFi Signal Strength:

Ensure Proper Placement: Make sure your Ring camera is within range of your WiFi router. Avoid obstructions such as walls or large objects that may weaken the WiFi signal.

Test Signal Strength: Use your smartphone or a WiFi analyzer app to check the signal strength in the area where the camera is located. A weak signal may indicate the need for a WiFi extender or a more powerful router.

Restart Your Camera:

Power Cycle: Disconnect the power source from your Ring camera by unplugging it or removing the battery. Leave it unplugged for about 30 seconds, then reconnect the power source.

Reset Button: If power cycling doesn’t work, locate the reset button on your Ring camera and press it for about 15 seconds. This will reset the camera to its factory settings, allowing you to set it up again.

Restart Your Router:

Power Cycle: Disconnect the power source from your WiFi router by unplugging it. Leave it unplugged for about 30 seconds, then reconnect the power source.

Factory Reset: If power cycling doesn’t work, you may need to perform a factory reset on your router. Refer to the manufacturer’s instructions for the specific steps to do this.

Check WiFi Network:

Verify Network Name and Password: Ensure that the network name (SSID) and password you are entering for your WiFi network are correct. Typos or incorrect information can prevent your Ring camera from connecting.

Network Compatibility: Check that your WiFi network supports the required specifications for your Ring camera. For example, some Ring cameras only support either 2.4GHz or 5GHz WiFi bands, so verify compatibility with your router.

Ring Camera Won’t Connect to WiFi: Troubleshooting Guide插图3

Adjust Network Settings:

Channel Interference: If you are experiencing WiFi interference, changing the channel on your router’s settings may improve the connection. Consult your router’s manual for instructions on how to change the channel.

Bandwidth Allocation: Ensure that your router is not limiting bandwidth for your Ring camera. Adjust the settings to allocate sufficient bandwidth for your camera to connect and transmit data.

Update Firmware:

Camera Firmware: Ensure that your Ring camera is running the latest firmware version. Check the Ring app or the Ring website for firmware updates and instructions on how to install them.

Router Firmware: Similarly, make sure your WiFi router is running the latest firmware version. Check the manufacturer’s website or the router’s administration panel for firmware updates and installation instructions.

Contact Ring Support:

Troubleshooting Resources: Visit the Ring website or consult the Ring app for additional troubleshooting resources specific to your camera model. Ring provides comprehensive support and guides to help resolve connectivity issues.

Customer Support: If you have exhausted all troubleshooting steps and your Ring camera still won’t connect to WiFi, reach out to Ring’s customer support for further assistance. They can provide personalized guidance and solutions to your specific issue.

Ring Camera Won’t Connect to WiFi: Troubleshooting Guide插图4

Conclusion:

When your Ring camera won’t connect to WiFi, following a systematic troubleshooting process can help you identify and resolve the issue. By checking the WiFi signal strength, restarting your camera and router, verifying network settings, and updating firmware, you can troubleshoot connectivity problems effectively. Remember to consult the Ring website, app, or customer support for additional resources and assistance. With a stable WiFi connection, your Ring camera will be able to provide the security and peace of mind that it is designed for.

« Older posts